|
Introduction to Mechanical Engineering Theory, Statics
Want to optimize your robot parameters mathematically? Want to verify that an expensive motor you are about to purchase has enough torque? This is a math tutorial for robot chassis construction. This tutorial is useful if you would like to mathematically either prove your robot will work, or optimize it so that it would work better. Better yet, I have one of those degree thingies in Mechanical Engineering so this tutorial should be extra useful . . . My approach will be talking about the most common calculation uses of mechanical forces for robots. I will offer specific application examples, the theory, equations, and some pretty graphs to help you understand.
Theory: Statics
Statics is concerned about how a mechanical system would act if everything is perfectly motionless and rigid. It is the most fundamental of all calculations, and mathematically is no more complicated then highschool algebra. All you need to understand is how to build an equation from the mechanical parts you use. Remember in elementary you learned (or should have learned) that for every force there is an equal and opposite force? For example, if I were to stand straight, then push you forcefully, I would end up forcefully pushing myself back at an equal amount. If you push a wall, the wall is pushing you back. Why is this important? Easy. If an object weighs 10 pounds, your actuator needs to be able to lift at least 10 pounds. This sounds numbingly simple, right? Now suppose you add in friction of joints, efficiency rates, multiple actuators, and unevenly distributed weight across an oddly shaped object. Obviously the problem can balloon to something quite complex. This is what I will talk about, all directly relating to robotics and in simplified form.
Moment Arms
Moment arms will probably be the most useful for you. The basic equation is moment equals force times the distance of the beam the force is being applied perpendicularly at. Moment = Force * distance Here is the first example. What you see is an object of some length. It is fixed rigidly at one end. And the other has some force being applied to it. This force can be something hanging on it, something pushing it, a hammer hitting it, a gear moving it, gravity/weight, etc. Does not really matter. 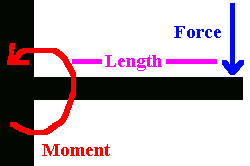 All you do is measure the distance and multiply that by the force that is being applied. You should always know the expected force being applied to your robot, or you are taking a risk of buying an actuator that is too weak or too big and strong. If the robot is lifting a beer can, know the weight of the can. If the robot is climbing, know the estimated weight of the robot. Even rudimentary calculations can help you better understand the force requirements of your robot. 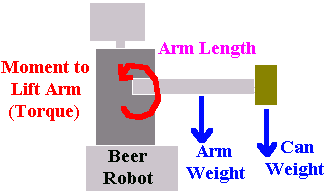 Now suppose your robot is lifting a beer with an arm. A moment about the shoulder is being created by both the weight of the can, but also the weight of the robot arm itself. How do you calculate this? You would add the moments created by each together. Moment = can_weight * arm_length + arm_weight * 1/2 * arm_length Notice that for the arm length we only use half the value. Why? Because weight is distributed throughout the entire arm. Theoretically all you are doing is adding up all of the force across the arm, and applying it to the center of mass of the robot arm. The center of mass is the exact point where an object can be perfectly balanced. I estimated the center of mass to be the midpoint (1/2 length) of your robot arm. However it may not be. You can easily find the center of mass of any object by balancing it on your finger and then measuring that distance with a ruler. Now suppose you have calculated the moment. What do you do with this number? This is actually the torque being applied. So when you look for a motor to power the shoulder of your robot, just reference this calculated value as your minimum required torque. The concept of the moment arm can be applied for many different situations. Sometimes the moment arm can be hidden, so here are a few more examples:
Pulleys
Calculating pulley forces is very simple. A pulley is a simple moment arm. The force being applied on the rope multiplied by the pulley radius is the torque being applied. But now notice that there are two forces countering each other. This is like two opposite moments, so you would subtract them. Remember, don't be confused by the device itself. Even if the pulley were square, the calculation would still be exactly the same. Can you see the moment arm in this example? 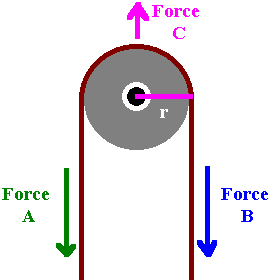 Moment = Torque = Force_A * Pulley_Radius - Force_B * Pulley_Radius or Torque = Pulley_Radius * (Force_A - Force_B) You should also note Force C, the force required to hold the pulley up.
Force C is always Force_A + Force_B + pulley_weight.
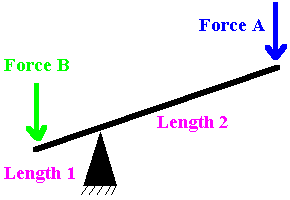
Crowbar - Mechanical Advantage Moment Balancing
Another example of a moment would be a crow bar. What you have is a beam, a pivot point in the center, and a weight on each end. Now suppose you have two exact same weights. Now move one of those weights real close to the pivot point. What will happen? The weight that did not move would go down. Although the force remained the same, the distance decreased, therefore resulting in a smaller moment.
Although this example looks very different from the rest, it is actually exactly the same. Both sides of the crowbar create a moment about the pivot point (the triangle tip). So your equation is this: Moment Side A = Moment Side B Force_A * Length_2 = Force_B * Length_1 Now if you knew any three variables out of the four, you can use simple algebra to calculate the fourth one. For example, suppose this was a see-saw at a childrens' playground. Now you have a 40 pound child sitting on one end, and you plan to catapult him into the next playground. Now this child is sitting exactly 4 feet from the pivot point. Your plan is to jump on it with your weight of 200 pounds. What is the closest distance to the pivot point you can stand on the see-saw and still lift the child into the air? filling in the equation:
40 lbs * 4 ft = 200 lbs * distance solving:
40 * 4 / 200 = distance = .8 feet
Safety Factor
If you are unsure of various perhaps uncalculatable factors, always add what is called a factor of safety. For example, suppose you guess a beer can weighs between 1 to 2 pounds. A factor of safety would say, 'design the system to handle 2.5 pounds, just in case.' So what should your factor be? Guess. I would recommend 1.2, but its really up to you. What does this number mean? Suppose your calculations say you need a motor rated at least 100Nm, then multiple that by 1.2 to get 120Nm as your minimum motor force. The factor of safety is not an exact science, obviously. If you expect to have high fatigue from shock or overuse, high friction, or bending, make the factor of safety higher. So why not make my safety factor really high? Well, you can, but motors with higher torques are also more expensive. Thicker robot materials can cost you more too. So why not a small safety factor? Well, if friction is much higher in your robot than you expected, your robot just won't work very well. 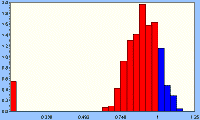 There is a more scientific method to the safety factor, called statistical analysis. This involves building then actually testing your robot part under various circumstances until it breaks. Then statistically (through a histogram) you can determine the optimal properties so it will NEVER break. However this involves building and breaking a part many times - too much effort for a single robot. This method is common for car and cell phone manufacturers. Did you know they statistically determine how many times you can drop a cell phone at any particular angle to make it user proof?
 Friction
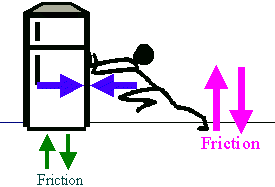
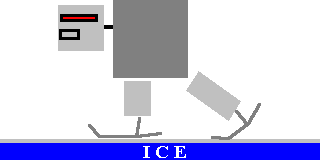
Calculating friction is often a black art. There are many situations which are hard to factor in such as surface tension, humidity, etc. But there are several sure ways to find a reasonable value to help you build your robot. The first thing you should look at is what is called the coefficient of friction. This is a dimensionless property which can be looked up for any two materials. What does this number mean? Well suppose you are standing on ice with rubber shoes and you want to calculate the pushing force required to slide across the ice. force of friction = weight * u.rubber-ice Just multiple the force being applied perpendicular to the contacting materials (your weight) and multiply that by the coefficient of friction of ice against rubber. This would be the force required to counter friction to slide across the ice. 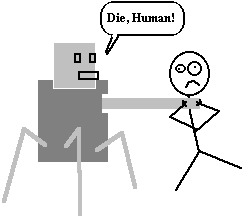  Understanding friction is also useful when designing robot pincers. If the friction is miscalculated, your robot victims would be able to escape! Now we cant have that . . . So here is how you do it. A robot pincer squeezes from both sides. So this is your force. The typical human however wants to fall down out of your robot pincers by gravity. 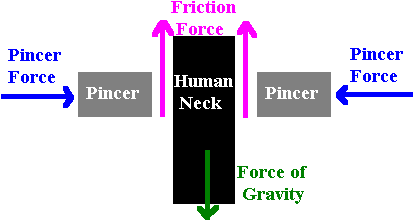 Now all you need to do is squeeze hard enough so that the force of friction is greater than the force of gravity. force_squeeze * u.pincer-human_neck > human_weight You probably won't find a reliable coefficient of friction for robot pincers rubbing up against a human neck, but using higher friction pincer material will help. Actually, finding the coefficient of friction can be a little more complicated. There are actually two coeffiecients. It turns out that friction is related to the rubbing velocity of the materials. Ever notice how it is easier to push a heavy object across the ground after it is already moving? The static coefficient of friction is when the materials are stationary.
The kinetic coefficient of friction is when the materials are already in motion against each other. What makes it a black art is that there is never any exact clear boundary between the two values. Here is a quick coefficient of friction lookup reference of some common materials you may use: Material 1
Aluminum
Aluminum
Plexiglass
Plexiglass
Polystyrene
Polystyrene
Polythene
Rubber
Rubber
Rubber
Rubber
Teflon
Teflon
Wood
Wood
Wood
Wood
Wood
Wood | Material 2
Aluminum
Steel
Plexiglass
Steel
Polystyrene
Steel
Steel
Asphalt (dry)
Asphalt (wet)
Concrete (dry)
Concrete (wet)
Steel
Teflon
Wood (clean)
Wood (wet)
Metals (clean)
Metals (wet)
Brick
Concrete | Static
1.05 - 1.35
0.61
0.8
0.4 - 0.5
0.5
0.3 - 0.35
0.2
0.5 - 0.8
0.25 - 0.75
0.6 - 0.85
0.45 - 0.75
0.04
0.04
0.25 - 0.5
0.2
0.2 - 0.6
0.2
0.6
0.62 | Kinetic
1.4
0.47
-
-
-
-
-
-
-
-
-
-
-
-
-
-
-
-
- |
Sumber : Society Of RoboticsLabels: Mechanic, Robotic, Statics
|