|
BRAZING TUTORIAL Have you ever wanted to weld parts on your robot, but couldnt because: - the equipment is too expensive
- too difficult to learn
- your parts are really small
- your parts are made out of aluminum
- you cannot get a permit to use it where you want
- potentially very dangerous
This is where brazing excels. Brazing is significantly cheaper, much safer, can do aluminum much easier, tiny parts no problem, equipment is much smaller, and best of all brazing is much simpler to learn!
What is brazing?
Brazing is the joining of metals through the use of heat and a filler metal - one whose melting temperature is above 840�F(450�C) but below the melting point of the metals being joined. You simply join two heated (but not melted) metals by melting a third metal as a 'glue.' Brazing is performed at relatively low temperatures, reducing the possibility of warping, overheating or melting the metals being joined. Brazing is ideally suited to the joining of dissimilar metals. You can easily join assemblies that combine ferrous with nonferrous metals, and metals with widely varying melting points. Brazed joints are strong. On non-ferrous metals and steels, the tensile strength of a properly made joint will often exceed that of the metals joined.
How Brazing Works
Brazing works by creating a metallurgical bond between the filler metal and the surfaces of the two metals being joined. The principle by which the filler metal is drawn through the joint to create this bond is capillary action. In a brazing operation, you apply heat broadly to the base metals. The filler metal is then brought into contact with the heated parts. It is melted instantly by the heat in the base metals and drawn by capillary action completely through the joint. 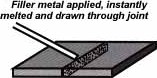
Brazing vs Welding
Brazing is not an inferior version of welding. After all, silver brazing is the customary method of joining high-reliability, controlled-strength corrosion-resistant piping such as a nuclear submarine's seawater coolant pipes. Welding joins metals by melting and fusing them together, usually with the addition of a welding filler metal. In order to fuse the metals, concentrated high temperature heat is applied directly to the joint area. This localized, pinpointed high heat is required in order to melt the base metals (the metals being joined) and the filler metals as well. Therefore welding temperatures start at the melting point of the base metals. Because welding heat is intense, it is impractical to apply it uniformly over a broad area. These high temperatures can cause problems, such as possible distortion and warping of the base metals or stresses around the weld area. But in brazing you do not need to melt the base metals to join them. It doesn't matter if they have widely different melting points. You can braze steel to copper as easily as steel to steel. Welding is usually more suited to the joining of large assemblies than brazing. Why? Because in brazing the heat must be applied to a broad area, often to the entire assembly. If the assembly is a large one, it's often hard to heat it to the flow point of the filler metal as the heat tends to dessipate faster than you build it up. 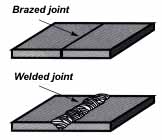 What are other advantages of brazing over welding? Brazing has better joint appearance. With minimal experience one can create professional looking joints. There is seldom any need for grinding, filing, or mechanical finishing after a joint is completed. Speaking of which, brazing is much easier for beginners to learn than welding. I suck at welding, but even my first attempt at brazing was perfect. Best of all for robots, you can make tiny parts without worry. For thin workpieces (e.g., sheet metal or thin-walled pipe) brazing is less likely to result in burn-through. I have easily brazed .005" sheets of steel together in seconds with zero warping.
When Would I Need Brazing?
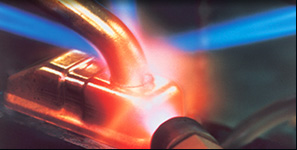
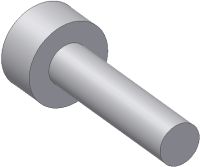
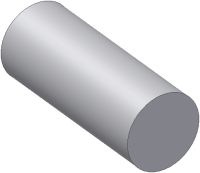
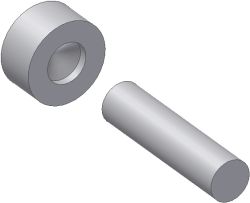
When making any robot part, you should consider the many ways that part can be made. Multiple methods may work, but some just may be way faster and/or cheaper. Brazing should be another method added to your arsenal of ways to manufacture a robot part. Brazing also offers two other benefits that no other method (except welding) could offer. The first is good high strength water proof seals. Making a robot sub, perhaps? The second is strong metal-to-metal joints. Mechanically-fastened joints (threaded, staked, riveted, etc.) generally don't compare to brazed joints in strength, resistance to shock and vibration, or water-tightness. Have you ever had a screw slowly unscrew itself on a robot mechanism? Brazing could quickly fix that problem. Just like any other manufacturing method, you must be clever to figure out if it is the best method to employ. For example, let me tell you about a 1" cam follower I once made for a robot. This is what the follower needed to look like: The cam would ride against the left large diameter side of the part, while the long shaft would slide in and out of a hole. The method I chose to make it was using a lathe. I took a single rod piece and slowly cut away the unneeded material to get that shape. This is what the original rod looked like before being cut, for comparison: Although the manufacturing method worked and I made my parts successfully, there were three serious problems I had. The first is that using a lathe for tiny precision parts is difficult and time consuming. The second is that I really wanted to use steel so the follower top wouldn't wear away under a steel cam, but cutting steel takes forever and it weighs much more - leaving me to no choice but to use aluminum. The last issue was that I had to make 10 of these such cams (hint: mass production methods better). Fortunately for me, when I had to build the next prototype, I thought of brazing. Instead of making the cam follower out of a solid cylinder, why not join two seperate parts? Now that I can simply buy two cylinders with the exact diameter I needed, the lathe was no longer necessary. And since brazing can join two different metals, I could use steel for the cam follower head, yet still use aluminum for the cam follower shaft. All I had to do was bandsaw and face the 20 different cylinder parts (done together, an hour of work), drill a small hole in each to help align the parts, then braze them together - a much simpler process than using a lathe. This is what the two parts looked like: And what they looked like assembled and brazed:  The rule of thumb: if your part requires cutting away large amounts of material to manufacture, consider using multiple simple parts brazed together. Creating a complex solid part from separate parts is easier than creating a complex solid part from one single machined block. As a bonus, I also got to use two different metals - making use of the advantages of each, without suffering from the disadvantages. I used the light weight easy to machine aluminum except where I needed the wear resistant properties of steel. Brazing Equipment
Total cost of all equipment you would need comes out to around ~$60 (all can be bought from mcmaster.com). More brazing equipment can be found in the ad links at the top right of this page. The first and most obvious item you would need is a brazing torch. I personally recommend the cheap $15 handheld types. Don't forget to only use the inner flame! I used McMaster #75195A16. 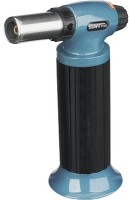 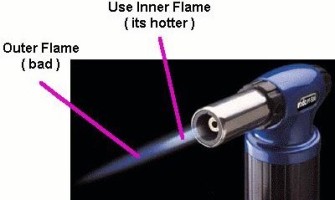 The next item is butane fuel.
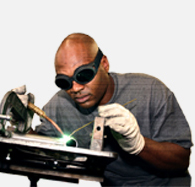
A single $3 butane gas can will supply you 2+ hours of burn time. I used McMaster #7694A5. 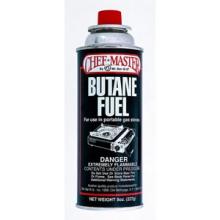 The third item you will need is the filler material, a brazing rod. I used McMaster #7676A4. This is the metal that melts and joins your two parts. There are many types of brazing rods, made out of various alloys. Find the type that is best for your particular application. Also, the type that has silver in it is better due to a lower melting point, but obviously will cost more. Expect to spend around $15 for a roll of brazing rods. Don't forget - cadmium in these rods emit poisonous fumes potent enough to vegetize even the cutest of kittens. Go to mcmaster.com and do a search for 'silver brazing alloy' and a whole bunch should show up on the right.  The last main item you will need to buy is brazing flux. I used McMaster #7693A2. An $8 half pound jar is way more than enough. Again, they have many types so find the type best for your application.  Now for safety items . . . The brazing flame can emit evil infrared and UV rays that zap you blind. Fortunately it is not like welding. You do not need a big clunky helmet thingy that makes everything impossible to see. Instead, you can get away with simple sunglasses rated for UV protection. You can also buy some really ultra-cool welding goggles like these (rated as a 3 or 4 lens shade number) for like $8:  The last item you will need is a $15 pair of leather heat resistant gloves.
You will probably be working with small parts, so get the type that gives you the best possible finger articulation.
Steps to Brazing
Step 1 - Clean Your Parts
Capillary action will work properly only when the surfaces of the metals are clean. If they are "contaminated" - coated with oil, grease, rust, scale or just plain dirt - those contaminants have to be removed. If you do not remove these contaminants, they will form a barrier between the base metal surfaces and the brazing materials. An oily base metal, for example, will repel the flux, leaving bare spots that oxidize under heat and result in voids. Oil and grease will carbonize when heated, forming a film over which the filler metal will not flow. And brazing filler metal won't bond to a rusty surface. Cleaning the metal parts is seldom a complicated job, but it has to be done in the right sequence. Oil and grease should be removed first, because an acid pickle solution aimed to remove rust and scale won't work on a greasy surface. (If you try to remove rust or scale by abrasive cleaning, before getting rid of the oil, you'll wind up scrubbing the oil, as well as fine abrasive powder, more deeply into the surface.) Start by getting rid of oil and grease. In most cases you can do it very easily either by dipping the parts into a suitable degreasing solvent, by vapor degreasing, or by alkaline or aqueous cleaning. Dishwashing detergent should work. If the metal surfaces are coated with oxide or scale, you can remove those contaminants chemically or mechanically. For chemical removal, use an acid pickle treatment, making sure that the chemicals are compatible with the base metals being cleaned, and that no acid traces remain in crevices or blind holes. Mechanical removal calls for abrasive cleaning. Particularly in repair brazing, where parts may be very dirty or heavily rusted, you can speed the cleaning process by using emery cloth, grinding wheel, or file or grit blast, followed by a rinsing operation. Once the parts are thoroughly clean, it's a good idea to flux and braze as soon as possible. That way, there's the least chance for recontamination of surfaces by dust or body oils deposited through handling. Step 2 - Brazing Location Setup
The location and setup for brazing is important. Brazing outside in bright sunlight is bad, in that you will not be able to see your flame. Brazing inside is bad in that you need poisonous fume ventilation. I personally use a fume hood, but a shaded well ventilated area should suffice. 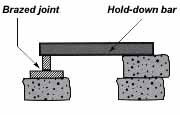 Next you need to secure the parts you wish to braze. What you use to mount your parts should have low heat conductivity (resists getting hot, like ceramic, concrete, steel, etc). When mounting your parts, try to leave a small gap between the two parts that will be brazed. For capillary action to be effective, joint clearances of 0.002 to 0.006 inch (50 to 150 um) are recommended. 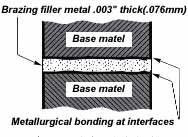 Step 3 - Flux Your Parts
Flux is a chemical compound applied to the joint surfaces before brazing. Heating a metal surface accelerates the formation of oxides, the result of chemical combination between the hot metal and oxygen in the air. Oxides will inhibit the brazing filler metal from bonding to your part surfaces. A coating of flux on the joint area, however, will shield the surfaces from the air, preventing oxide formation. Flux will also dissolve and absorb any oxides that form during heating or that were not completely removed in the cleaning process. Choose the flux formulated for the specific metals, temperatures, and conditions of your brazing application. Cover any surfaces that will be brazed completely and thoroughly right before brazing. Think of the flux as a sort of blotter. It absorbs oxides like a sponge absorbs water. An insufficient amount of flux will quickly become saturated and lose its effectiveness. A flux that absorbs less oxides not only insures a better joint than a totally saturated flux, but it is a lot easier to wash off after the brazed joint is completed. Flux can also act as a temperature indicator, minimizing the chance of overheating the parts. For example, some types of flux become completely clear and active at brazing temperature - telling you that the base metal is just about hot enough to melt the brazing filler metal. Also, you may want to add some flux to the end of the filler metal rod to improve the flow. Step 4 - Brazing
The actual brazing step is probably the easiest and quickest of the steps. If you are a novice, dont worry it is really easy, almost self-explanatory. Simply heat the joint between the two metals that you wish to join until just before they start to glow red (or until the flux becomes clear). Both metals in the assembly should be heated as uniformly as possible so they reach brazing temperature at the same time. Then touch the filler rod to the joint, and just let it melt right into the joint by itself. Molten brazing filler metal tends to flow toward areas of higher temperature. Remember, the filler will spread itself through capillary action. This is an example of proper brazing technique:
Step 5: Cleaning the Brazed Joint
After you've brazed the assembly, you must clean it. Cleaning is usually a two-step operation. - First - removal of the flux residues
- hot water bath
- then a hot hydrochloric acid bath
- Second - pickling to remove any oxide scale formed during the brazing process
Flux removal is a simple, but essential operation. Flux residues are chemically corrosive and, if not removed, could weaken certain joints. Since most brazing fluxes are water soluble, the easiest way to remove flux is to quench the assembly in hot water (120F/50C or hotter). Your best bet is to immerse them while they're still hot, just making sure that the filler metal has solidified completely before quenching. The glass-like flux residues will usually crack and flake off. If they're a little stubborn, brush them lightly with a wire brush while the assembly is still in the hot water. Using live steam will work too. The only time you run into trouble removing flux is when you haven't used enough of it to begin with, or you've overheated the parts during the brazing process. Then the flux becomes totally saturated with oxides, usually turning green or black. In this case, the flux has to be removed by a mild acid solution. A 25% hydrochloric acid bath (commonly found in some toilet bowl cleaners and etching compounds), heated to 140- 160F/60-70C, will usually dissolve the most stubborn flux residues. Simply agitate the brazed assembly in this solution for 30 seconds to 2 minutes. No need to brush. A word of caution: acid solutions are potent. So when quenching hot brazed assemblies in an acid bath, be sure to wear a face shield and gloves. After you've gotten rid of the flux, use a pickling solution (such as Sparex precious metal cleaner) to remove any oxides that remain on areas that were unprotected by flux during the brazing process. The best pickle to use is generally the one recommended by the manufacturer of the brazing materials you're using. In the few instances where you need an ultra-clean finish, you can get it by polishing the assembly with a fine emery cloth.
Safety in Brazing
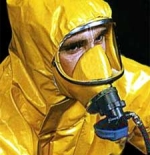
In brazing, there is always the possibility of dangerous fumes and gases rising from base metal coatings, ink, and cadmium-bearing filler metals, and from fluorides in fluxes. The following well-tested precautions should be followed to guard against any hazard from these fumes. Ventilate confined areas. Use ventilating fans and exhaust/fume hoods to carry all fumes and gases away from work, and air supplied respirators as required. I personally just use a fume hood, but doing the work outside will be fine too. Just don't do it on a bright sunny day as you wont be able to see the flame from your butane torch. Clean base metals thoroughly. A surface contaminant of unknown composition on base metals may add to fume hazard and may cause a too rapid breakdown of flux, leading to over heating. Heat the base metals broadly and uniformly. Intense localized heating uses up flux, increasing the danger of fuming. Use sufficient flux. Flux protects base metals and filler metal during heating cycle. Full flux coverage reduces fuming. Read the warning labels on the flux container. Know your base metals. A cadmium coating on a base metal will volatilize and produce toxic fumes during heating. Zinc coatings (galvanized) will also fume when heated. It is recommended to remove these coatings before parts are heated for brazing. Be especially careful not to overheat the assembly when using filler metals that contain cadmium. Read all warning labels on the brazing rod packaging. Wear safety goggles and rubber gloves when using the pickling solutions. Read warning labels. Dispose of all chemicals properly - don't just pour it down the drain! More Information
I want to recommend this brazing tutorial. My tutorial just skims over the need to know basics, but this tutorial goes into serious detail if you are interested in perfecting your brazing skills. sumber : Society Of Robotics
Labels: Brazing, Mechanic, Robotic
|